Fixed Keyword Queries in the Search Core Results Web Part

27 Sep

You can set a fixed keyword query in a “Search Core Results” web part so that it displays results that you specify pulled from multiple site collections. For example, you can configure a search results web part so that it always displays all tasks that are assigned to you within a specific scope.

In my example, I’ll show you how to configure the “Search Core Results” web part to show all documents that I’ve authored within a specific scope. Once you know how to configure the search web part, you can play around with different fixed keyword queries.

Create a page to add the “Search Core Results” web part

  1. On your site, click Site Actions > View All Site Content > Create
  2. Select Web Part Page
  3. Choose a page name, select a layout template, select a location to save the web part page and then click Create

Add and Configure the “Search Core Results” web part

  1. On the page you created above, click Site Actions > Edit Page to edit the page
  2. Once in edit mode, click Add a Web Part
  3. Choose the “Search Core Results” web part and click Add
  4. On the web part, click edit > Modify Shared Web Part
  5. In the web part properties on the right, expand the Results Query Options grouping
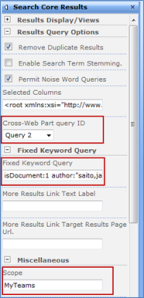
  6. For “Cross-Web Part query ID”, choose “Query 2”
  7. In the web part properties, expand the Fixed Keyword Query grouping
  8. In the “Fixed Keyword Query” area, put in your keyword query. To show all documents that I’ve authored, my keyword query would be:

    isDocument:1 author:”saito,jaclyn”

  9. In the web part properties, expand the Miscellaneous grouping
  10. For the “Scope”, specify your scope – in this example my scope is called MyTeams. This is because I only want documents that I’ve authored that are in that scope. Your web part properties should now look something like this:

    FixedKeyword settings

  11. Click OK to save your web part configurations and publish the page (or exit edit mode)

    By default you will get the first 10 results. If you want to page through the rest of the results, you’ll need to add the Search Paging web part to the page.

    In this blog post, we looked at how to configure a “Search Core Results” web part to set a fixed keyword query.
Reusing Web Parts

20 Sep

Have you ever added a Content Editor Web Part (CEWP) to a page, spent time formatting the text/table/image in the content editor and then wanted to show this content in multiple locations?

I bet the first thing you thought to do was to copy the content, add a CEWP to the other page, and paste the contents into the content editor. While sometimes this method works, sometimes it doesn’t copy the exact formatting or sometimes it causes the CEWP to error (in which case you can add “?contents=1” to the url to get to the web part maintenance page and delete the web part) as a result of accidentally copying invalid html.

A better and faster way to reuse content is to export the web part from the current page and import it into the new page — the content will remain the same and you wont need to re-configure the CEWP to change any of the content. If you are using this web part many times throughout a site collection, it might be a good idea to add the web part to your site’s web part gallery – then you can add the web part like any other web part.

This blog post will focus on how to export a web part, import a web part and add the web part to a site’s web part gallery.

Export a web part

After you have added a CEWP to your page and formatted it, you can export the web part:

  1. Click the edit dropdown of the web part and then Export…

  2. Click Save and save the web part to your desktop (or any other temporary location)

Now we will import the web part to another page.

Import a web part

To import the web part to another page:

  1. Navigate to the page where you want to add the CEWP
  2. Click Site Actions > Edit Page
  3. Click the web part zone that you want to add the web part
  4. When the Web part dialog appears, click Advanced Web Part gallery and options
  5. On the right, click on the dropdown to the right of “Browse” and then click Import

  6. Browse to the location of the web part that you exported and then click Open
  7. Click Upload
  8. You will notice that your web part has been uploaded. Scroll to the bottom, choose which web part zone to add the web part and then click Import – you should now see your web part added to the page

Add the web part to the web part gallery
**Requires permissions to the Site’s Settings**

If you are using this web part in multiple locations within a site collection and you don’t want to keep importing the web part, you can also choose to add the web part to the site’s web part gallery – then you can add the web part directly from the web part dialog.

  1. Click Site Actions > Site Settings ( > Modify All Site Settings if you have the publishing feature activated on your site)
  2. Under the Galleries heading, click Web Parts
  3. Click Upload
  4. Browse to the location of the web part that you exported and then click Open
  5. Click OK
  6. After specifying the web part properties, click OK — you should now see your web part in the gallery
  7. Now you can use it directly from the web part dialog:
    1. Navigate to the page where you want to add the web part
    2. Click Site Actions > Edit page
    3. Click on a web part zone
    4. Expand the All Web Parts section if necessary — you should see your web part

    5. Choose your web part and then click Add

In this blog post, we looked at how to re-use web parts instead of re-creating them each time by importing and exporting the web part.

**NOTE: If you change one of the CEWP after you have exported/imported to another page, the changes will not take affect in the other CEWPs. If you want this capability, you should look into using SharePoint’s “Reusable Content” capability

Using a Survey vs. a Custom List

15 Sep

In SharePoint you have the ability to create surveys. However, just because you have questions that you want to ask a group of people or you want to get feedback from a group of people doesn’t necessarily mean you should use a survey — sometimes using a custom list (and having the questions be list columns) can be a better option because a custom list is more flexible than a survey.

Below I’ve documented a survey’s advantages and disadvantage that I’ve come across from my experiences using them that I hope can help you decide whether you want to use a survey or a custom list:

Advantages:

  • Has a setting to only allow one response per person
  • Submitters can remain anonymous
  • Capability to create multi-page forms
  • Branching logic (ie. You can have people fill out different questions based on their previous answers)
  • Provides a rating scale answer type
  • Provides graphical results (most useful for choice and rating types)

Disadvantages:

  • Can’t seem to export to excel
  • Doesn’t look like you can create custom list views
  • Can’t do Nintex workflows on surveys
  • The “Save” button can be confusing

Have you noticed any other advantages or disadvantages of using surveys vs custom lists?